iPhone 14 Pro Max camera lenses (Photo: Apple Inc)
Similar to the iPhone 11 Pro, iPhone 12 Pro and iPhone 13 Pro lines, the iPhone 14 Pro and Pro Max camera has three lenses. The iPhone 14 Pro, Max main lens is 24 mm vs 26 mm in the iPhone 11, 12 & 13 Pro. The telephoto lens in the 11 and 12 Pro is 52mm. In the 13 Pro and 14 Pro, the telephoto lens is 77 mm. The lens focal lengths in the Apple specifications are the equivalent focal length of a 35 mm camera, not the actual focal length.
Screen shot of the iPhone 14 Pro Max camera interface
12MP Ultra Wide: 13 mm, ƒ/2.2 aperture with a 120° field of view, six‑element lens:
Photo of the Golden Gate Bridge and San Francisco taken with iPhone 14 Pro Max lens,
12MP Ultra Wide: 13 mm, ƒ/2.2 aperture and 120° field of view
Photo of the Golden Gate Bridge and San Francisco taken with iPhone 14 Pro Max main lens, 24 mm, ƒ/1.78 aperture, taken from Hawk Hill in the Marin Headlands
Photo of the Golden Gate Bridge and San Francisco taken with iPhone 14 Pro Max 12MP 2x Telephoto (enabled by quad-pixel sensor): 48 mm, ƒ/1.78 aperture, from Hawk Hill in the Marin Headlands
Apple includes a 12MP 2x Telephoto (enabled by quad-pixel sensor): 48 mm, ƒ/1.78 aperture, second-generation sensor-shift optical image stabilization, seven‑element lens, 100% Focus Pixels, which isn’t an image produced from a 48 mm lens but by taking 12 MP from the center of the 48 MP sensor and then doing some image processing on it:
Photo of the Golden Gate Bridge and San Francisco taken with iPhone 14 Pro Max main lens, 24 mm, ƒ/1.78 aperture, taken from Hawk Hill in the Marin Headlands
I bought a Raspberry Pi model B revision 2.0 nine years ago and I’ve been using it with various cameras as a webcam server pointed out my window in places that I’ve lived. (The window where I have the camera now gets direct sun on sunny days, causing a lot of lens flare.)
On my Pi Model B, Motion had been crashing frequently with the errors, “unexpected camera control callback event, 0x4f525245” and “motion_watchdog: Thread 1 – Watchdog timeout Trying to do a graceful restart.” I was never able to sort out the problem after spending more time on it (here and here) than I wanted.
With the new Raspberry Pi Zero W 2, I had initially tried installing the just released Raspberry Pi OS, Bullseye, but I saw that other people were having some problems with Motion and Bullseye, so I installed Buster 10.11 instead.
I used the Raspberry Pi Imager app to setup the micro SD card. One thing that I had forgotten with the imager app was that using Ctrl-Shift-x will bring up an Advanced options dialog box where you can set the hostname, enable SSH, configure WiFi and locale settings. This makes it easier to do a headless setup. After I found the Pi Zero’s IP address on my network (by looking at the client list on my Asus router) I gave it a static IP address then used these great Circuit Basics instructions to setup Motion.
I also installed Apache Web server using the command:
sudo apt install apache2 -y
With the Pi Model B, I had the webcam’s address on a subdomain of my site. I used Dynamic DNS (on Google Domains, my registrar) to redirect to the IP address that my Pi was running on. Because I wanted to enable HTTPS on the camera URL, I got a certificate from Let’s Encrypt, so the URL, pizero.lesliewong.us:8081, was able to use the HTTPS protocol. IIRC, on the Model B, I was able to edit /etc/motion/motion.conf and add the lines:
stream_tls on
webcontrol_tls on
webcontrol_key /path to…/privekey.pem
webcontrol_cert /path to…/fullchain.pem
to enable HTTPS streaming. When I did that on my new setup, it didn’t work because the version of Motion that I installed wasn’t compiled with SSL/TLS support, which I found when I ran the command:
sudo systemctl status motion
After spending a lot of time trying to get that to work and failing using stream_tls, I found a way using the Apache Module mod_proxy:
sudo a2enmod proxy
sudo a2enmod proxy_http
I also added two lines to the file /etc/apache2/sites-enabled/000-default-le-ssl.conf (where /webcam is the URL on the domain, e.g., domain.com/webcam):
In the video poster frame, you can see the water just outside San Francisco Bay in the gap between the orange barriers. That doesn’t help my acrophobia, especially knowing that there is a 227 foot drop to the water. And it’s only blocked by a temporary Cyclone fence.
There’s almost always a constant wind off the Pacific Ocean, blowing across the bridge to the east . This year, the bridge authority retrofitted the railings to withstand 100 mph gusts. Now, when the wind is >25 mph, the new sidewalk railings emit a deafening hum that can be heard miles away. Add the sound of cars and trucks three feet away going south at 50 mph, it’s not a wonderful experience.
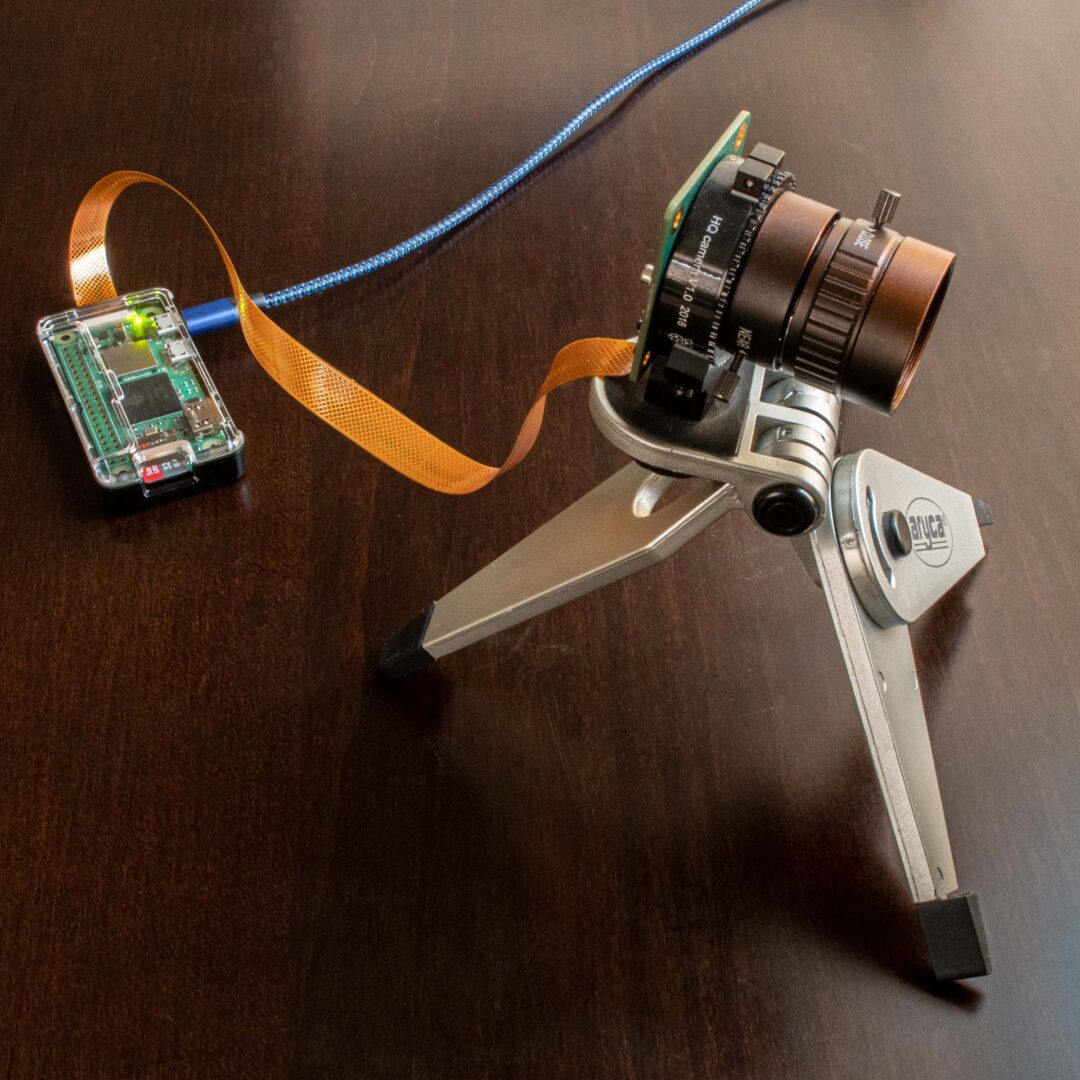
Update (January 25, 2021) My Raspberry Pi powered webcam is now showing the Jordan Park Neighborhood in San Francisco, California. The Raspberry Pi Model B, Rev 2 is using the Raspberry Pi High Quality Camera (with the Raspberry Pi HQ Camera Lens – 6mm Wide Angle) and is running Motion (pi_buster_motion_4.3.2-1_armhf). Details to follow.
(Original post) I built a streaming webcam showing the view from my downtown Oakland apartment in November 2012. I used a Raspberry Pi (Model B Revision 1.0) and the Raspian Wheezy (2012-10-28) image. For the webcam/web server software, I used MJPG-streamer. The problem with MJPG-streamer is that if the images/stream is available on the internet, then anyone can access the software.
Recently my Raspberry Pi began to lose the WiFi connection. In researching various solutions, I disabled WiFi power management on the Edimax EW-7811Un nano-size USB WiFi adapter. That didn’t solve the problem. I switched to Ethernet but the connection still dropped.
The checkwifi.sh script worked great, but then I had an issue with the video stream image oscillating. The image would continually go between light and dark and the only way to stop it was to restart MJPG-streamer.
I decided to update to the current Raspbian Jessie with Pixel and some other webcam software. The Motion-Project seemed not to difficult – I could use it as a streaming webcam. I decided to use Motion 4.0 and Kenneth Lavrsen’s Motion 4.0 Guide to help set it up. I don’t know if the image oscillation is an issue caused by using the Creative Live! Cam Chat HD (auto exposure?) but this current setup seems to have resolved the issue.
Manage Consent
To provide the best experiences, we use technologies like cookies to store and/or access device information. Consenting to these technologies will allow us to process data such as browsing behavior or unique IDs on this site. Not consenting or withdrawing consent, may adversely affect certain features and functions.
Functional
Always active
The technical storage or access is strictly necessary for the legitimate purpose of enabling the use of a specific service explicitly requested by the subscriber or user, or for the sole purpose of carrying out the transmission of a communication over an electronic communications network.
Preferences
The technical storage or access is necessary for the legitimate purpose of storing preferences that are not requested by the subscriber or user.
Statistics
The technical storage or access that is used exclusively for statistical purposes.The technical storage or access that is used exclusively for anonymous statistical purposes. Without a subpoena, voluntary compliance on the part of your Internet Service Provider, or additional records from a third party, information stored or retrieved for this purpose alone cannot usually be used to identify you.
Marketing
The technical storage or access is required to create user profiles to send advertising, or to track the user on a website or across several websites for similar marketing purposes.