Ultrafire C2 modded with a Cree MC-E

Ultrafire C2 with Cree MC-E

In late 2007, I bought a couple of Ultrafire C2 flashlights. They were nicely made for an inexpensive flashlight and they used Cree XR-E LEDs (P4 bin).

Last fall, I modded one of my C2s with a Seoul Semiconductors Z-Power LED P7. The P7 is a quad die LED. I made it direct drive running off a single Li-Ion 18650 battery. There were mods that could be made for a circuit board to drive the P7 but I was too lazy to make one.

I recently found a 3-Mode Regulated Circuit Board for Cree MC-E and SSC P7 LEDs (SKU 1217) sold by Shiningbeam.com that advertises an output current of 2500 mA on high. It has only three modes: high, medium and low. The 17mm diameter of the board is a direct fit in many pills, including a lot of P60s and the Ultrafire C2. I used one of the boards to improve a DealExtreme P60 MC-E drop-in.

I had another of the Shiningbeam boards and a quad die Cree MC-E LED, so I decided to put them in my other Ultrafire C2.

Ultrafire C2 pill with Cree MC-E

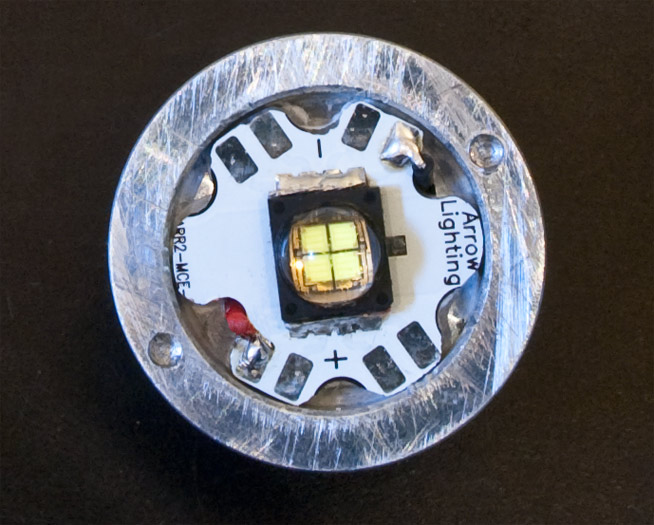
I soldered the LED to a trimmed down DealExtreme Star Connection and Heatsink for Cree MC-E LED Emitters – Parallel (SKU 16545). I’m not sure why they call it a parallel board, because each die is separately addressable with the connections on the board. I soldered all the anodes together and all the cathodes together, so it would run in parallel.

With a fully charged Li-Ion 2400 mAh battery, I measured the current at a little over 2700 mA through the tailcap. After five minutes, the flashlight was hot, but not so hot that I couldn’t touch it. It also dimmed slightly from initial turn-on but it is still brighter than my P60 MC-E mod.

With a McClicky switch in the tailcap, this is a really nice, bright flashlight now.

Solarforce L2m

Solarforce L2m
Solarforce L2m

I recently bought a Solarforc L2m flashlight host (head assembly, battery tube and tail switch assembly). The L2m is only 4.5″ long (~115 mm).

The head assembly is designed for a Surefire P60-sized drop-in. Fizz753 over at Candlepowerforums.com has compiled a very complete and up-to-date list of LED drop-ins.

I used one of my modded Cree XR-E (Q5 bin) LED drop-ins with a DealExtreme 16-Mode 3W 3.7V 7135 Circuit Board (SKU 7612) stuck in it.

Power is provided by a single protected Li-Ion RCR123A 3.7V battery. This 16340 size battery gives about 30 minutes on full with the 7612 board. I haven’t measured the current out of the board, but the specs say 1000 ma, so the output, according to Cree (Cree® XLamp® XR-E LED Data Sheet – PDF), is probably about 180-200 lm.

The next mod I made was replacing the reverse clicky switch with a McClicky switch. The last thing I’ll probably do is replace the crenelated ring on the head with a plain one.

Jet-I Pro I.B.S. Flashlight

My latest flashlight is the JETBeam Jet-I Pro I.B.S. V1. It uses a single AA size battery to power a Cree XR-E 7090 LED (PDF) (Q5 bin). The JETBeam Jet-I Pro I.B.S. came with a lanyard, removable clip, spare tail cap, two spare o-rings and a warranty card.

Jet-I Pro I.B.S. Packaging

BugOutGearUSA.com, where I purchased my Jet-I Pro I.B.S. for $64.95 USD, now lists a Jet-I Pro I.B.S. 2.0. From what I’ve read, the 2.0 is only cosmetically different.

According to JETBeam specs, the lens is sapphire crystal and the body is T6061 T6 aluminum with a type III hard anodized finish. The dimensions: Bezel diameter – 25mm, Tail diameter – 19mm, Overall length – 100mm, while the weight is 50g.

The push button tail cap switch is a “reverse” click type, i.e., the switch will make or break contact after it clicks. I prefer the “tactical” or forward click switch – a forward click switch will allow a half press of the switch to turn on a flashlight.

I tried fitting two forward click switches – one that I removed from my LumaPower D-Mini Digital and a McClicky switch. Neither fit. Unable to find a forward click switch, I settled for replacing the black tail cap with a glow-in-the-dark silicone tail cap.

JETBeam Jet-I Pro I.B.S.

Because the Jet-I Pro flashlight will accept an input voltage of up to 4.2V, it can use a rechargeable 3.7V 14500 Lithium battery. The Lithium battery gives a not insignificant 100 more lumens when compared to a 1.5V Alkaline AA battery or a 1.2V rechargeable NiMH.

The main attraction of the Jet-I Pro is the I.B.S. (Infinite Brightness Setting) technology. The I.B.S. circuit allows for three operating modes, A, B and C, each of which can be set at any output of ~2 to 225 lumens. Any mode can also be set to one of five strobe modes including 1Hz to 15Hz, warning signal, standby (flash once every 8 seconds), 100% SOS and 5% SOS.

When reading about programming the flashlight, it seems complicated. In practice, it’s relatively simple. BugOutGearUSA.com has a page with the Jetbeam I.B.S. User Interface Instructions.

Output & Runtime (from JETBeam):

AA Battery
Max Output: 130 Lumens, lasting for one hour;
High Output (Default Mode A): 110 Lumens, lasting for 75 min;
Low Output (Default Mode B): 20 Lumens, lasting for 3.5 hours;
Minimum Output: 2 Lumens, lasting for 45 hours;

JETBeam Jet-I Pro I.B.S. Cree XR-E 7090 LED

Rechargeable lithium Battery
Max output: 225 lumens, lasting for half an hour;
High output (Default Mode A) 180 lumens, lasting for 45 min;
Low output (Default Mode B) 20 lumens, lasting for 8 hours;
Minimum Output: 2 lumens, lasting for 50 hours;

Compared to my modded LumaPower D-Mini Digital (Cree Q5, DX 7612, single RCR123 and McClicky) the Jet-I Pro wasn’t as bright. But the D-Mini’s reflector is smooth, is deeper and 50% larger in diameter. The JETBeam Jet-I Pro I.B.S. is a great flashlight for its size and versatility.

Surefire 6P Switch Mod

Surefire 6P Flashlight
Surefire 6P Flashlight (photo courtesy of SureFire, LLC)

I bought a Surefire 6P to house my Malkoff Devices M60 drop-in. You have to be kind of a flashaholic to understand that sentence.

Surefire describes the 6P as a “Compact (pocket sized), high-intensity incandescent flashlight for tactical, self-defense, and general use. (It) produces a smooth, brilliant, pre-focused tactical-level beam with three times the light of a big two-D-cell flashlight.”

The 6P’s stock lamp assembly is a P60 incandescent lamp. You can stop right there and you have a great flashlight that puts out 65 lumens.

Malkoff Devices M60 Drop-in

The Malkoff Devices M60 drop-in (now replaced by the M61 with a Cree XP-G) uses a Cree XLamp XR-E LED (Q5 bin) as a replacement for the incandescent lamp. In addition to being more rugged, it puts out 235+ lumens. Gene Malkoff, the creator of the M60 says, “It will easily illuminate objects at 350+ feet and will blind opponents within a 100 foot radius.” That’s what we want.

Naturally, when I get something new, I take it apart and think about how to mod it. My new Surefire’s switch seemed like a good candidate.

The Surefire Z41 tailcap is standard on the 6P. It has a momentary option by pushing the tailcap switch. Rotating the tailcap will turn on the light for constant operation.

Surefire Z41 tailcap
Surefire Z41 tailcap with McClicky switch

Most of my flashlights use a forward clicky switch. A slight press of the switch (before it clicks), will momentarily turn on the light and a full press (when the switch clicks), will latch it on. I’ve put the McClicky switch in seven or eight of my flashlights and thought it would work well in the Surefire 6P. I could have bought a Surefire Z59 Click-on Tailcap Switch or the Oveready McClicky Kit for USD $22, but it’s more satisfying making my own.

I yanked out the insides of the existing switch and unscrewed the retaining ring. Sometimes the retaining ring is glued. I’ve put the tailcap in a ziplock bag and boiled it hot water for five minutes and the glue will release.

McClicky Switch
McClicky Switch with soldered brass tab for contact

Since I only had a plastic retaining ring to hold in the new switch, I soldered a piece of brass to the McClicky switch so that it contacts the inside of the switch housing. I put a dab of solder on the contact on the other side so the retaining ring would seat the switch flat inside the tailcap.

If you have an aluminum or brass retaining ring, there is no need to solder a tab – just screw it in. You must be careful about the inner part of the retaining ring contacting the positive connection on the raised plastic below the contact spring – it will short out the switch and be “on” all the time. A piece of shrink tubing or electrical tape wrapped around it will prevent a short.

Using that piece of brass also meant I had to remove the anodizing from the inside of the housing so the brass tab makes electrical contact with the side of the tailcap. With one mod that I did, I lost the lock out function, which “prevents accidental activation of light during tactical engagements, transportation, or storage,” according to Surefire. On another mod, the lock out still worked. In my case, I’m very unlikely to have a tactical engagement, so I can remove the batteries for transportation and storage.

  Glow-in-the-Dark Silicone Tailcap
Glow-in-the-Dark Silicone Tailcap

To bottom it off, I replaced the black rubber push button cover with a Glow-in-the-Dark Silicone Tailcap…maybe a not too tactical feature.