I found this Regina Extra Record Ti Freewheel in my bicycle parts box. My friend Kenny bought it in the early 80’s and I used it for a few miles and then put it in the parts box.
It is a six speed freewheel with 13-14-15-17-18-19 tooth cogs and Italian threading – 1.378″ x 24 TPI. When I recently removed the cogs to clean them, part of the freewheel body looked like it was made out of aluminum. All the cogs are threaded and made of titanium but I was unable to separate the last two cogs (18-19) from the freewheel body.
When I looked at the freewheel listings on VeloBase.com, I saw a Regina Extra Record freewheel that has aluminum cogs but I didn’t see an Extra Record freewheel with titanium cogs.
I checked eBay listings for titanium freewheels and there were several that sold in the $250-$500 range. That reminded me of the Steven Spielberg authored episode of Amazing Stories: Gather Ye Acorns.
I’m a big fan of Cree LEDs. I use them in almost all my flashlights. Last month, a Cree LED light bulb was introduced that replaces a 60 watt incandescent bulb. (Cree Press Release) The bulb retails for $12.97.
Specifications from Cree:
9.5 Watts (84% less energy)
800 Lumens brightness
25,000 Hour rated lifetime
$1.14* Annual energy cost
Lifetime savings: $139*
Warm color temperature: 2,700K
Lights instantly, omni-directional
Mercury free
Safety-coated glass
Dimmable
10-Year Limited Warranty
UL damp rated
Fits most lamps
Diameter: 2.4 inches
Length: 4.6 inches
*Cree’s calculation of $1.14 yearly operating cost is based on 3 hours/day and $0.11 per kWh. Cree’s lifetime savings calculation is based on $0.11 per kWh when compared to 60W incandescent and 25,000 hour lifetime.
It seems that the Cree LED Light Bulb is only available so far from Home Depot. I bought my bulb online from Home Depot and with $1.17 sales s surprised that the light bulb’s envelope felt like it had a rubber coating. It has a standard North American Edison screw E26 socket. I replaced a 15W warm compact fluorescent bulb (CFL) that was in a table lamp with the Cree LED Light Bulb. The LED seems brighter.
When I removed the lamp shade to photograph the bulb, I noticed that the bulb was hot enough so that I couldn’t hold it – so despite consuming only 9.5 watts, it still gets very hot. There is a heat sink around the base of the envelope.
When I photographed the illuminated bulb, I set the camera’s color balance for daylight, so the yellow color of the light reflecting off the wall in the background is a good representation of what it looks like to the human eye.
LED bulb: Cree 9.5-Watt A19 Warm White (2700K) LED Light Bulb (1-Pack) ($12.97 25,000 hour life)
Cost of electricity from PG&E, about $0.13/kWh.
To get 25,000 hours with a 60 watt incandescent bulb, you would need 25 of them, at a cost of $36.50. The cost of 4 CFL bulbs for 25,000 is $34.68. The cost of the Cree LED bulb for 25,000 hours is $12.97.
There’s no question about the cost savings of the LED bulb versus incandescent. Total cost for 60 watt incandescent bulbs for 25,000 hours is $231.50. Total cost for 15 watt CFL bulbs for 25,000 hours is $83.43. Total cost for a 9.5 watt LED bulb for 25,000 hours is $43.85.
People who want to keep using incandescent bulbs may not be able to do the math or maybe they’re using them to keep their popcorn warm.
After the failure of an old computer running Windows Server 2003, I setup Windows Server 2012 on a Macbook.
Years ago, I set up a Sony Vaio PCG-Z505HS running Windows Server 2003 at home so I could keep up with Macs and Active Directory. When I recently experienced problems with DHCP and DNS, I discovered that the Vaio had died. There was no LED power indication. My troubleshooting consisted of jiggling the power connector and checking the power supply voltage. When I measured voltage from the AC adaptor, I gave up, using the rationale that it had lived its useful life. The Vaio, with a Pentium 3, 500 MHz CPU, was introduced in January 2000.
The Windows Server 2012 installation was simple using the Server with a GUI mode installation. The Server Manager and configuration tools greatly simplify the setup. With Windows Server 2012 on a Macbook running silicon introduced in 2006 – an Intel® Core™2 Duo Processor T7200 that has Intel® Virtualization Technology (VT-x), the next step is to try virtualization. As a Macbook running OS X, I successfully ran VMware Fusion VMs running Ubuntu and Windows 2000, though I forsee the 3 GB of RAM in the current system will be a limiting factor.
The best part about running an Active Directory domain at home is joining computeres to the domain. The welcome message says, “Welcome to the lower_slobbovia domain.
ifixit’s MacBook Core 2 Duo Logic Board Replacement guide was helpful with the disassembly. After removing the logic board, I stripped the bottom case of the remaining parts (SSD, hard disk, speakers, display, etc). The MacBook logic board was short enough to fit in the case with the ports and connectors lining up with the opening for the Mini-ITX backplane.
I thought using the Macbook bottom case would be the best way to mount the system board because the case helps to align the MagSafe connector and the fan/heatsink assembly. I also wouldn’t have to mount other stand-offs in the Mini-ITX case. I used Dremel cut-off wheels to cut down the case bottom. To mount the logic board in the Mini-ITX case, I used double-sided foam tape.
The wiring for the ancillary devices – Wi-Fi, Bluetooth and speakers – were routed around the inside of the new case. The Mini-ITX case came with a bracket to mount 3.5″ hard drives internally but with non-standard headers on the logic board, I abandoned that idea. There was also a power supply, which I removed. I wired the power switch on the front of the case to the trackpad/keyboard connector on the logic board.
Macbook in a Mini-ITX Case
I had already removed the DVD drive when it stopped working in the summer of 2011 and replaced it with an SSD. I used double-sided tape to mount the SSD and the second hard drive to a bracket mounted above the logic board. Eventually, the short cable for the second hard disk failed and when I replaced it, the connector on the logic board failed from too many insertions.
When I first powered it on, it actually worked. The Mini-ITX case is slightly larger than a Mac mini (200 x 225 x 56mm vs 197 x 197 x 36mm) and slightly less attractive but it works. My only regret was breaking the circuit board for the system LED when I was disassembling the case.
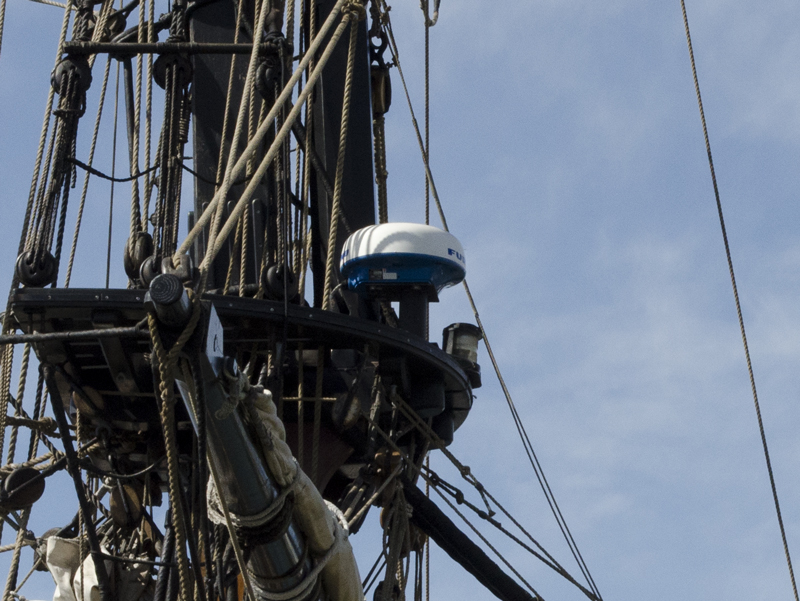
According to the Pirates of the Caribbean Wiki, “The HMS Interceptor was a brig in the British Royal Navy serving under King George II, most notably under the command of Captain, later Commodore, James Norrington. As a ship in the British fleet, the Interceptor was purported to be the fastest vessel commissioned to His Majesty’s service.”
The Furuno radome, mounted on the foremast above the yard, probably helped capture some of those pirate ships, though in the end, HMS Interceptor couldn’t escape the Black Pearl.
Manage Consent
To provide the best experiences, we use technologies like cookies to store and/or access device information. Consenting to these technologies will allow us to process data such as browsing behavior or unique IDs on this site. Not consenting or withdrawing consent, may adversely affect certain features and functions.
Functional
Always active
The technical storage or access is strictly necessary for the legitimate purpose of enabling the use of a specific service explicitly requested by the subscriber or user, or for the sole purpose of carrying out the transmission of a communication over an electronic communications network.
Preferences
The technical storage or access is necessary for the legitimate purpose of storing preferences that are not requested by the subscriber or user.
Statistics
The technical storage or access that is used exclusively for statistical purposes.The technical storage or access that is used exclusively for anonymous statistical purposes. Without a subpoena, voluntary compliance on the part of your Internet Service Provider, or additional records from a third party, information stored or retrieved for this purpose alone cannot usually be used to identify you.
Marketing
The technical storage or access is required to create user profiles to send advertising, or to track the user on a website or across several websites for similar marketing purposes.