I recently bought a Solarforc L2m flashlight host (head assembly, battery tube and tail switch assembly). The L2m is only 4.5″ long (~115 mm).
The head assembly is designed for a Surefire P60-sized drop-in. Fizz753 over at Candlepowerforums.com has compiled a very complete and up-to-date list of LED drop-ins.
I used one of my modded Cree XR-E (Q5 bin) LED drop-ins with a DealExtreme 16-Mode 3W 3.7V 7135 Circuit Board (SKU 7612) stuck in it.
Power is provided by a single protected Li-Ion RCR123A 3.7V battery. This 16340 size battery gives about 30 minutes on full with the 7612 board. I haven’t measured the current out of the board, but the specs say 1000 ma, so the output, according to Cree (Cree® XLamp® XR-E LED Data Sheet – PDF), is probably about 180-200 lm.
The next mod I made was replacing the reverse clicky switch with a McClicky switch. The last thing I’ll probably do is replace the crenelated ring on the head with a plain one.
When I bought my first Surefire 6P flashlight, I found that the Malkoff M60 (now replaced by the M61) was one of the best P60 LED drop-ins.
I like the beam profile produced by the optic in the Malkoff M60, a hot spot with useful spill. The disadvantage of the Malkoff M60 – for me – is its single mode. I do not need 100% brightness all the time – lower levels of light are sometimes more useful.
One of my favorite flashlight mods is using the DealExtreme 16-Mode 3W 3.7V 7135 Circuit Board for Cree and SSC Emitters (SKU 7612). I like this circuit board because one of the groups has only low-mid-high, with no strobe. I’ve modded my Lumapower D-Mini, an Ultrafire C2 and a few P60 drop-ins with this board.
The modes are in three groups:
1. Low (10%) – Mid (35%) – High (100%) – Strobe – SOS 2. Low (10%) – Mid (35%) – High (100%) 3. Low (10%) – Mid (35%) – High (100%) – Special Police Type Strobe – Slow Strobe (3Hz) – Super Slow Strobe (1Hz) – SOS
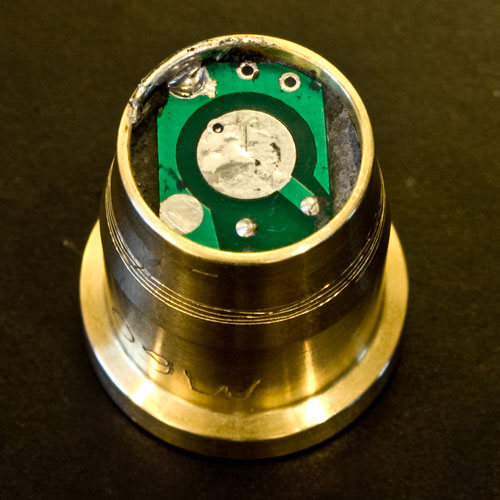
Malkoff M60 with driver board removed
I recently bought a Surefire 6P flashlight body that was bored to accept a larger diameter 18650 battery. I thought the DX 7612 would be a good mod for a Malkoff M60. The main problem was getting up the nerve to try to mod the Malkoff M60 because of the possibly destroying a $55 drop-in, but I decided to try it.
The sealing material used around the circuit board and LED in the M60 is called potting. The rear of the drop-in is sealed with this material. I thought it would be a hard material but I found the it was actually soft and rubbery. I used a jeweler’s screwdriver as a chisel to start removing it. As I got close to the circuit board, I used a little lacquer thinner to soften the black sealing material. When I removed all the potting from the top of the board, I used some more lacquer thinner to soften the material in the gaps in the side. After removing the solder, I was able to pry up the circuit board and remove it.
The diameter of the DX 7612 board is about 17mm. The Malkoff had about 16.5mm diameter space for the board, so I used a Dremel sanding band to reduce the diameter of the 7612.
Malkkoff M60 with DealExtreme DX 7612 driver
As I disassembled the Malkoff, the robust design was easy to see. When I desoldered the Malkoff circuit board from the housing, I could tell from the way it retained the heat (because of its mass), how well it would work as a heat sink inside the flashlight body.
With the DX 7612 on high and an 18650 battery, the modded Malkoff output looks pretty much the same as the stock Malkoff M60 on high with two RCR123s. I haven’t taken any measurements, but the specs for the 7612 says it puts out 1000ma @ 3.7v, and since I didn’t move the LED or the optic, it seems like my modded Malkoff M60 is just like the stock one but with different levels.
My favorite flashlight is my JETBeam JET-I PRO I.B.S. As I wrote in this post, “The push button tail cap switch is a “reverse” click type, i.e., the switch will make or break contact after it clicks. I prefer the “tactical” or forward click switch – a forward click switch will allow a half press of the switch to turn on a flashlight.”
The contact spring on the LumaPower switch was a little too long, so I soldered on a shorter one. The switch’s circuit board was a snug press fit over the threads in the JETBeam tail cap. Switching modes now only requires a half press.
My latest flashlight is the JETBeam Jet-I Pro I.B.S. V1. It uses a single AA size battery to power a Cree XR-E 7090 LED (PDF) (Q5 bin). The JETBeam Jet-I Pro I.B.S. came with a lanyard, removable clip, spare tail cap, two spare o-rings and a warranty card.
Jet-I Pro I.B.S. Packaging
BugOutGearUSA.com, where I purchased my Jet-I Pro I.B.S. for $64.95 USD, now lists a Jet-I Pro I.B.S. 2.0. From what I’ve read, the 2.0 is only cosmetically different.
According to JETBeam specs, the lens is sapphire crystal and the body is T6061 T6 aluminum with a type III hard anodized finish. The dimensions: Bezel diameter – 25mm, Tail diameter – 19mm, Overall length – 100mm, while the weight is 50g.
The push button tail cap switch is a “reverse” click type, i.e., the switch will make or break contact after it clicks. I prefer the “tactical” or forward click switch – a forward click switch will allow a half press of the switch to turn on a flashlight.
I tried fitting two forward click switches – one that I removed from my LumaPower D-Mini Digital and a McClicky switch. Neither fit. Unable to find a forward click switch, I settled for replacing the black tail cap with a glow-in-the-dark silicone tail cap.
JETBeam Jet-I Pro I.B.S.
Because the Jet-I Pro flashlight will accept an input voltage of up to 4.2V, it can use a rechargeable 3.7V 14500 Lithium battery. The Lithium battery gives a not insignificant 100 more lumens when compared to a 1.5V Alkaline AA battery or a 1.2V rechargeable NiMH.
The main attraction of the Jet-I Pro is the I.B.S. (Infinite Brightness Setting) technology. The I.B.S. circuit allows for three operating modes, A, B and C, each of which can be set at any output of ~2 to 225 lumens. Any mode can also be set to one of five strobe modes including 1Hz to 15Hz, warning signal, standby (flash once every 8 seconds), 100% SOS and 5% SOS.
When reading about programming the flashlight, it seems complicated. In practice, it’s relatively simple. BugOutGearUSA.com has a page with the Jetbeam I.B.S. User Interface Instructions.
Output & Runtime (from JETBeam):
AA Battery Max Output: 130 Lumens, lasting for one hour; High Output (Default Mode A): 110 Lumens, lasting for 75 min; Low Output (Default Mode B): 20 Lumens, lasting for 3.5 hours; Minimum Output: 2 Lumens, lasting for 45 hours;
JETBeam Jet-I Pro I.B.S. Cree XR-E 7090 LED
Rechargeable lithium Battery Max output: 225 lumens, lasting for half an hour; High output (Default Mode A) 180 lumens, lasting for 45 min; Low output (Default Mode B) 20 lumens, lasting for 8 hours; Minimum Output: 2 lumens, lasting for 50 hours;
Compared to my modded LumaPower D-Mini Digital (Cree Q5, DX 7612, single RCR123 and McClicky) the Jet-I Pro wasn’t as bright. But the D-Mini’s reflector is smooth, is deeper and 50% larger in diameter. The JETBeam Jet-I Pro I.B.S. is a great flashlight for its size and versatility.
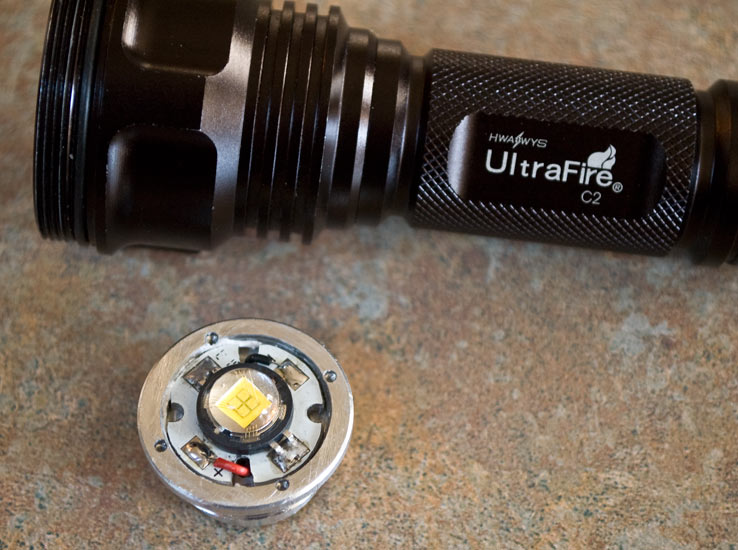
In the Home Made and Modified Lights section, jirik_cz modded his Ultrafire C2 flashlight with a SSC P7. For power, he used a Li-Ion 18650 3.7V battery directly driving the LED. It is a simple and elegant mod.
I happened to have a spare Ultrafire C2 flashlight waiting for a great idea like jirik_cz’s mod. I already had the P7 emitter (C bin) mounted on a heat sink base. An advantage of having the P7 emitter on a heat sink base is that the positive base of the bare emitter is isolated from ground.
I used a Dremel to enlarge the Ultrafire pill so the P7, on some heat sink compound, fit perfectly.
For the positive battery contact side of the pill, I stripped a 17mm diameter circuit board and soldered the LED leads to it. To accommodate the larger diameter LED, (the Ultrafire C2 uses a Cree XLamp® XR-E LED), I enlarged the hole in the reflector with a reamer.
Thanks to jirik_cz, now I have a 5″ (130mm) long flashlight that is a bright as my Roar of the Penguin.
Manage Consent
To provide the best experiences, we use technologies like cookies to store and/or access device information. Consenting to these technologies will allow us to process data such as browsing behavior or unique IDs on this site. Not consenting or withdrawing consent, may adversely affect certain features and functions.
Functional
Always active
The technical storage or access is strictly necessary for the legitimate purpose of enabling the use of a specific service explicitly requested by the subscriber or user, or for the sole purpose of carrying out the transmission of a communication over an electronic communications network.
Preferences
The technical storage or access is necessary for the legitimate purpose of storing preferences that are not requested by the subscriber or user.
Statistics
The technical storage or access that is used exclusively for statistical purposes.The technical storage or access that is used exclusively for anonymous statistical purposes. Without a subpoena, voluntary compliance on the part of your Internet Service Provider, or additional records from a third party, information stored or retrieved for this purpose alone cannot usually be used to identify you.
Marketing
The technical storage or access is required to create user profiles to send advertising, or to track the user on a website or across several websites for similar marketing purposes.