Assembly only requires removing the label from the SSD, applying some heatsink compound to the cover of the adapter and screwing it together. Before I plugged the SSD into the adapter, I used a little DeoxIT on the contacts.
Sintech CFexpress Type-B to NVME M.2 SSD card, PA-CFEM2-N adapter, Western Digital PC SN520 NVMe 256GB SSD
I was a professional photographer in New York City for 20 years (in the film era). I definitely would not use the Sintech card for an assignment where money was involved. I would use a memory card that’s on the Nikon approved list.
In the future, I will do some testing on the Sintech card and will add the results. For now, the card does work in my Nikon D500:
Nikon D500 Control Panel showing 5.4k image count with the Sintech CFexpress adapter and WD SN520 NVMe SSD
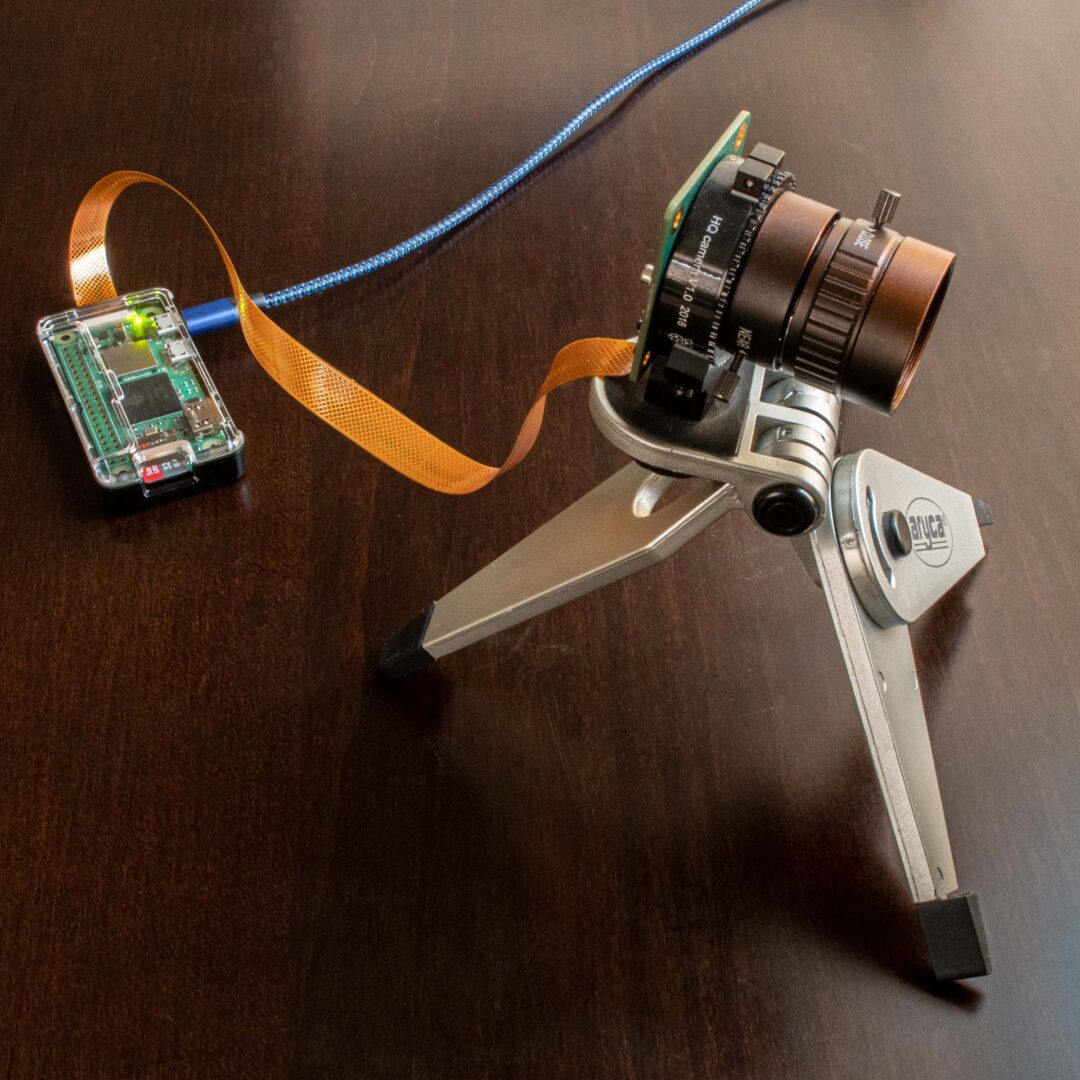
I bought a Raspberry Pi model B revision 2.0 nine years ago and I’ve been using it with various cameras as a webcam server pointed out my window in places that I’ve lived. (The window where I have the camera now gets direct sun on sunny days, causing a lot of lens flare.)
On my Pi Model B, Motion had been crashing frequently with the errors, “unexpected camera control callback event, 0x4f525245” and “motion_watchdog: Thread 1 – Watchdog timeout Trying to do a graceful restart.” I was never able to sort out the problem after spending more time on it (here and here) than I wanted.
With the new Raspberry Pi Zero W 2, I had initially tried installing the just released Raspberry Pi OS, Bullseye, but I saw that other people were having some problems with Motion and Bullseye, so I installed Buster 10.11 instead.
I used the Raspberry Pi Imager app to setup the micro SD card. One thing that I had forgotten with the imager app was that using Ctrl-Shift-x will bring up an Advanced options dialog box where you can set the hostname, enable SSH, configure WiFi and locale settings. This makes it easier to do a headless setup. After I found the Pi Zero’s IP address on my network (by looking at the client list on my Asus router) I gave it a static IP address then used these great Circuit Basics instructions to setup Motion.
I also installed Apache Web server using the command:
sudo apt install apache2 -y
With the Pi Model B, I had the webcam’s address on a subdomain of my site. I used Dynamic DNS (on Google Domains, my registrar) to redirect to the IP address that my Pi was running on. Because I wanted to enable HTTPS on the camera URL, I got a certificate from Let’s Encrypt, so the URL, pizero.lesliewong.us:8081, was able to use the HTTPS protocol. IIRC, on the Model B, I was able to edit /etc/motion/motion.conf and add the lines:
stream_tls on
webcontrol_tls on
webcontrol_key /path to…/privekey.pem
webcontrol_cert /path to…/fullchain.pem
to enable HTTPS streaming. When I did that on my new setup, it didn’t work because the version of Motion that I installed wasn’t compiled with SSL/TLS support, which I found when I ran the command:
sudo systemctl status motion
After spending a lot of time trying to get that to work and failing using stream_tls, I found a way using the Apache Module mod_proxy:
sudo a2enmod proxy
sudo a2enmod proxy_http
I also added two lines to the file /etc/apache2/sites-enabled/000-default-le-ssl.conf (where /webcam is the URL on the domain, e.g., domain.com/webcam):
Update (September 20, 2021): I updated to build 22458 with an NTFS formatted external USB 3.0 hard disk attached. But after the successful update, I plugged a M.2 SSD into the same USB 3.0 bus that had a working 4TB USB 3.0 hard disk and got the same errors as I describe below. I switched back to the Beta channel and updated successfully to 22000.194 with the all external drives connected.
TL;DR Windows Insider Build 22458 and the previous two builds (22454 & 22449) won’t install with a connected external USB 3.0 drive that has an APFS partition and NTFS partition.
On September 15, 2021, Microsoft released Windows 11 Insider Preview Build 22458 to the Dev Channel. I had switched back to the Beta Channel (22000.184) because my attempts to install the two previous developer releases (22449 and 22454) failed.
I switched back to the Developer Channel to try the new build and 22458 started installing but after the reboot, I was back at 22000.184. The two external USB 3.0 drives that I had connected during installation caused the problem. Disconnecting the drives then letting Windows Update install 22458 worked. But connecting the external USB 3.0 drives caused the same problems as the two previous builds.
I had Disk Manager open as I connected the two drives and they would show up without drive letters, then the Bluetooth keyboard and mouse would disconnect. The drives would disappear and reappear from Disk Manager and the Bluetooth would reconnect. After disconnecting the external drives 22458 worked as expected. I rolled back to 22000.184
Since I have a 5TB internal disk drive on the system SATA controller, I finally realized that I should try an external USB 3.0 drive formatted only NTFS. This drive worked with 22458 with no problems, so I am concluding that 22458 and the previous two Developer builds don’t like drives with non NTFS partitions (though I have not tried any Linux file systems).
Update (September 9, 2021): Microsoft released Windows 11 Insider Preview Build 22454 to the Dev Channel. My attempts to install 22454 were the same as my experience below with attempting to install Build 22449.
When Windows 11 Insider Preview Build 22449 was released on September 2, 2021, I got a Green screen DRIVER_PNP_WATCHDOG error on many installation attempts.
Green screen DRIVER_PNP_WATCHDOG
I tried:
disabling IDE in BIOS
changing IDE/ATA controller driver from Intel(R) 500 Series Chipset Family SATA AHCI Controller to generic Microsoft driver
switching to beta channel, installing 22000.176 then back to the dev channel and attempting to install 22449
disabling all non-MS services in msconfig
None of those made any difference. I had 2 USB 3.0 external drives connected and when I disconnected those, the installation of 22449 was successful.
I had the same result doing a clean install with the 22000.132 ISO and updating to 22449.
The motherboard is an Asus ROG Strix Z590-I with an Intel Core i7-11700K. The Bluetooth driver is Intel Wireless Bluetooth v22.80.0.4. The IDE ATA/ATAPI controllers are Intel(R) 500 Series Chipset Family SATA AHCI Controller v18.31.1.1033.
MacBook Pro (Retina, 15-inch, Mid 2012) System Board. The Broadcom BCM94360CS Wi-Fi/Bluetooth adapter with 802.11ac is at the lower left, next to the fan
The Apple Macbook Pro is generally thought of as not too upgradeable but since my MacBook Pro (Retina, 15-inch, Mid 2012) is past its 8th birthday, I’ve had to do a few mods and repairs to keep it going. I bought the computer new in 2012, with the 2.3 GHz Core i7 (i7-3615QM) and 8 GB of RAM.
Because I use a Windows Boot Camp partition, I am hoping that Apple will release one more 16″ Macbook Pro with a Comet Lake i9-10980HK before the switch to Apple Silicon Arm Macs.
Over the years, I’ve upgraded the SSD from 256GB to 1TB, replaced the keyboard after a coffee spill, realigned the lid after dropping the computer, replaced the battery and today (and hopefully last), I changed the Wi-Fi/Bluetooth adapter to a Broadcom BCM94360CS so I could get 802.11ac speeds.
Speedtest with Macbook Pro (Retina 2012) BCM94360CS Wi-Fi adapter, the same speed I get with the Apple Thunderbolt to Gigabit Ethernet Adapter
With my mesh network anchored with an Asus RT-AX92U (#ad), I was only able to get <30-60 Mbps downloads on Wi-Fi with the stock BCM94331CSAX adapter (802.11n) compared to >200 Mbps with the Apple Thunderbolt to Gigabit Ethernet Adapter (#ad). In late 2012/early 2013, Apple added 802.11ac capability to the Airport/Bluetooth board which is a simple drop-in replacement for the 2012 802.11a/b/g/n board. The part number for the board is BCM94360CS or similarly, BCM94360CSAX. I bought mine on eBay.
Manage Consent
To provide the best experiences, we use technologies like cookies to store and/or access device information. Consenting to these technologies will allow us to process data such as browsing behavior or unique IDs on this site. Not consenting or withdrawing consent, may adversely affect certain features and functions.
Functional
Always active
The technical storage or access is strictly necessary for the legitimate purpose of enabling the use of a specific service explicitly requested by the subscriber or user, or for the sole purpose of carrying out the transmission of a communication over an electronic communications network.
Preferences
The technical storage or access is necessary for the legitimate purpose of storing preferences that are not requested by the subscriber or user.
Statistics
The technical storage or access that is used exclusively for statistical purposes.The technical storage or access that is used exclusively for anonymous statistical purposes. Without a subpoena, voluntary compliance on the part of your Internet Service Provider, or additional records from a third party, information stored or retrieved for this purpose alone cannot usually be used to identify you.
Marketing
The technical storage or access is required to create user profiles to send advertising, or to track the user on a website or across several websites for similar marketing purposes.